Prices of graphics processing units (GPUs), which are the most expensive part of a computer, continue to rise at an alarming rate. Some high-end GPUs can cost well over $1000. If you’re looking into building the best gaming machine possible, you will want to spend all you can on your graphics card and still play the latest titles without saying goodbye to framerates.
The only way to keep prices low is if you are willing to reduce the performance of your graphics card. If this is not an acceptable option, one must consider liquid cooling the GPU and other ways to keep their graphic cards cool while maintaining high FPS. By installing water blocks, you can enjoy your favourite titles without having to pay for ridiculous cooling solutions that would not only cost more than the graphics card itself but could also potentially void your warranty.
GPU mining, in particular, is a bad idea in this case, as ASICs are continuing their relentless progress and quickly outperforming even the most powerful GPUs available. But what about the rest of us who want to play our favourite games without worrying about dying batteries or overheating? Well, if you’re looking for a new graphics card, the answer is now clear.
Components Guide
Liquid cooling GPUs are not new, but they have always been reserved for those at the highest levels of PC gaming. However, now that prices on high-end cards have shot up significantly due to huge demand and low availability, it makes more sense than ever to put together a liquid-cooled rig. In the past, it Typically worked by attaching your graphics card to a CPU water block, which cools both components at once but requires you to open up your case and add additional noise from a different water pump. Our testing today will instead show you how to use a standalone GPU water block to cool only the GPU, allowing you to upgrade or change your graphics card without having to replace your entire cooling system.
To begin with, you’ll need several components:
- A water block designed for your specific graphics card
- Adhesive Thermal Pads,
- Small Philips head screwdriver,
- Thermal Paste or thermal pads designed for graphics cards,
- A Dremel tool with a diamond bit and cutting wheel.
Get your water block from a reputable source, as many out-of-production models may not fit your card or have poor mounting brackets that bend under pressure.
AMD and Nvidia make their own reference graphics cards, but third-party manufacturers like MSI, EVGA, Gigabyte, Zotac, Asus, PNY, and others are also popular. Most of these companies have their custom coolers on the Founders Edition cards, which are not compatible with aftermarket water blocks. However, if your card is a custom cooled model like the MSI Twin Frozr cards, you’ll probably need to buy a separate water block as those coolers are not compatible with other aftermarket blocks.
Luckily enough, if your GPU is from Nvidia, they make their reference cooler available for sale directly from them and can be purchased separately on sites like eBay. These reference cards are identical to the non-reference cards from other manufacturers but without a third-party cooler attached. With that in mind, the installation is the same as any other block you buy online.
The first thing you’ll want to do before even taking your card out of its box is download GPU-Z and check for compatibility. Then, go to the website under “Support” and click on your GPU. If it shows up, you’re ready to continue.
If, for some reason, your card is not compatible with any of the existing blocks or doesn’t show up in GPU-Z.Small copper shims are usually available that can make most aftermarket cards work reasonably well with most water blocks, especially for applications where the GPU isn’t being pushed to its limits.
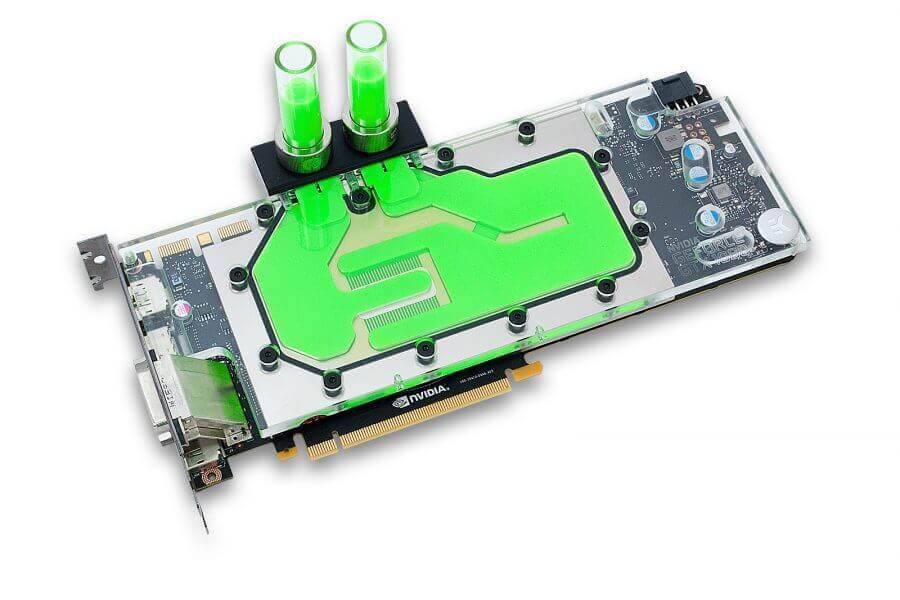
As you’ll see in our example installation, we are using a reference Nvidia GTX 1080 Founders Edition card, which is not compatible with any of the aftermarket blocks available at this time. We plan on getting one of the 3rd party FE coolers to test with, but until then, not having one will allow us to show you how to install any block on nearly any card without modifying it.
Reference cards like this are usually sold directly by Nvidia or your GPU manufacturer and always come with a reference cooler attached. We’ll be using the EK-FC1080 GTX as our example water block in this guide. You’ll notice that it looks nearly identical to the Nvidia cooler, with the only real difference being a slightly different port configuration on the block itself. Installation is the same as any other graphics card, and your reference model should look very similar when you upgrade your cooling system.
Installation Guide
Step 1 :
We’ll start by removing everything from the card. The screws can usually be found under your driver’s license sticker and require a small Philips head screwdriver to remove.
Step 2 :
Once you have all four screws removed, carefully lay your card down on its side and pop off the backplate, exposing the heatsink and components underneath. Be careful with this step as these components are very fragile and can be damaged very easily.
Step 3 :
Once you have all four screws removed, carefully lay your card down on its side and pop off the backplate, exposing thNext, carefully unclip the heatsink from the PCB by pushing it down on one of the metal clips near an edge until it’s free. You’ll see how the Heatpipe is attached to this piece as well, so try not to bend it too badly, or you’ll likely need to replace it. This piece is useless without the card attached to it anyway, so don’t worry too much about breaking it.
Step 4 :
Once you have all four screws removed, carefully lay your card down on its side and pop off the backplate, exposing thNext, carefully unclip the heatsink from the PCB by pushing it down on one of the metal clips near an edge until it’s free. You’ll see how the Heatpipe is attached to this piece as well, so try not to bend it too badly, or you’ll likely need to replace it. This piece is useless without the card attached to it anyway, so don’t worry too much about breaking it.
Step 5 :
Once all thermal pads are removed, flip your card over to see the front side of it and remove any screws in place here as well.
Step 6 :
Next, we’ll want to remove our stock heatsink from the PCB. It can do this by carefully applying pressure along a flat surface near a corner and popping it off. Once you have a good grip on it, gently wiggle back and forth between the different components until they break free from one another. You should see something like this when you’re done.
Step 7 :
If all goes well, you should now have a bare PCB with the stock heatsink off to the side. We’ll be installing our water block here in a minute, but first, we need to get any old thermal paste off of it. The best way to do this is by using Arctic Silver’s Ceramique thermal pad remover.
Step 8 :
Put a bit of the liquid on your exposed GPU die and gently spread it around with one of your fingers. You don’t need to go too far out or be very thorough about this step, as you want to remove any old paste before applying new ones. I usually focus more on the memory modules since the thermal pads you placed earlier are easy to wipe off when cleaning accidentally.
Step 9 :
Once you’ve removed any old paste and allowed the surface to dry for a few moments, we can now apply a new thermal paste. Arctic Silver’s MX-4 is what we’ll be using here, and this type of thermal paste has been my go-to paste for years on end. I have very little experience with other brands, but there.
Step 10 :
Once your die is cleaned, use a lint-free cloth or paper towel to dry off the die before moving on. Arctic Silver’s Artic Clean is alcohol-based and will remain slightly conductive once dry. If any residue remains behind, it’s important to ensure it’s completely dry before continuing.
Step 11 :
Once your die is clean and dry, it’s time to apply the thermal paste! Using either the pea-drop method or line method for application, spread a very thin layer of thermal paste over the GPU die. This layer should almost be unnoticeable once applied and looks a bit like a layer of frost when finished.
Installing Water Block On GPU
Once your die is covered in thermal paste, it’s time to install your water block on GPU!
- This one uses a universal bracket that can be installed with either four countersunk screws or hex standoffs. This block came with some protective plastic on the top for shipping, so if yours has that, you’ll need to peel it off before screwing your water block down.
- At this point, we’re in a pretty good place to test out our new water-cooled Radeon RX 480! To do so, all you need to do is connect your power cables back to the graphics card and get it powered on. I highly recommend using both 6-pin AND 8-pin PCIe connections since GPUs draw much power and need to be kept well within the proper specifications. If you have any concerns about your video card’s status, I recommend you check it with GPU-Z.
Monitoring Temperature After Liquid Cooling The GPU
After enabling Windows mode from within the standard method, open up MSI Afterburner and start-up Unigine Heaven. To get to this window quickly in future testing, hold down the Windows key and press “R” to bring up the Run prompt. From here, enter “heaven” and click OK:
- Depending on what software you’re using, getting your temperature numbers from your graphics card can be as easy as clicking a button. In Afterburner, all you have to do is hover your mouse over the “GPU” line item on top and select “Temp”:
- After selecting Temp, GPU-Z will display your temperatures just below where it shows your core clock speeds:
- Unless you like to keep your case open and never use the side panel, it’s usually a good idea to check how loud your graphics card is running, especially if it’s water-cooled! To do this on MSI Afterburner, hover your mouse over the “Noise” line item on top and select “Mute.”After selecting Mute, GPU-Z will display how loud your graphics card is running in decibels directly below, where it shows your temperature:
- The benefits of water cooling a graphics card go well beyond just lowering its temperature. By keeping the GPU within proper operating specifications, you’ll reduce fan speed and be able to maintain a quieter system overall!
- The last thing I wanted to mention is how even after installing a water block, you can still use “GPU Tweak II” and change some aspects of your graphics card’s performance! To get to this window quickly in future testing, hold down the Windows key and press “R” to bring up the Run prompt. From here, enter “tweak” and click OK:
- With GPU Tweak II, you can change some of your graphics card’s performance without removing the water block. Here I’ve overclocked the memory from 8 GHz up to 9 GHz!
- If you’re interested in how well liquid cooling your graphics card performs, I’ve posted a few benchmark results below. It is with the same graphics card before and after deciding and liquid cooling it:
Conclusion
If you’re overclocking or even just building a new system, I always recommend liquid cooling your graphics card to get the best stability and performance. Liquid cooling a GPU may seem intimidating, but it’s not as complicated or scary as it may seem at first!
Overclocking your graphics card gives it not only a substantial increase in performance but also makes your entire system run much cooler! Before liquid cooling my overclocked graphics card, I was getting up to 90C when running Unigine Heaven. After installing the water block and deciding my card, I’m now getting much lower temperatures well within specifications.
While it’s not required, I recommend checking how hot your graphics card runs after some heavy benchmarking. It will make it easier to know if you should start monitoring your computer’s temperature and keep an eye on how high yours is running during some games or other programs!
In the future, we’ll show you more of what you can do with a water block installed on your graphics card! But for now, if you have any other questions, feel free to leave a comment below.
Frequently Asked Questions
What is the purpose of liquid cooling a GPU?
Liquid cooling a graphics card is done for many reasons. You can install one to reduce your computer’s noise, overclock your GPU, maintain stability, and prevent damage to it due to overheating. It also improves performance in many cases.
What if water gets into my computer?
Don’t worry about this! If any water comes out of your cooler when you take it off your graphics card, pour it back in through the fill tube on the side. Also, make sure not to spill too much when you put your cooler back on, or else it will leak out later when you’re using your computer (which could be dangerous).
How do I install a water block on a GPU?
With some basic tools, it’s really easy to install a water block on your graphics card. However, it would be best to make sure to use thermal paste on the GPU die before applying your water block.
What are some good aftermarket coolers for GPUs?
My favorite is deciding and installing an AIO with a 360mm radiator. It is because aftermarket coolers usually aren’t designed to fit graphics cards and can be very difficult to install. With a 360mm radiator, AIO’s is easier, look nice, and cool your GPU much better than air coolers.
What are some good water blocks for GPUs?
My personal favourite is the EKWB DCU IV because it looks nice, and you can change the color of your coolant. Another great water block is the EK-FC Titan X because it’s designed to fit over the memory and can be decided if necessary!