Installing drivers for your motherboard is crucial when setting up or upgrading your computer system. The motherboard serves as the backbone of your computer, connecting various hardware components and allowing them to communicate with each other. With the proper drivers, your motherboard may be able to fully utilize its features or function correctly, leading to performance issues, compatibility problems, and even system instability.
Motherboard drivers are software packages instructing the operating system to interact with the hardware components on the motherboard effectively. These drivers enable the operating system to recognize and control devices such as the chipset, audio, and network controllers, USB ports, and SATA controllers. Installing the correct drivers ensures that each component on your motherboard is appropriately identified and utilized, resulting in optimal performance and functionality.
In this article, we will guide you through each step of the driver installation process, from identifying your motherboard model to verifying the installation. We will also discuss the importance of updating drivers and provide troubleshooting tips to help you overcome common issues that may arise during the installation process. By following these instructions, you can ensure that your motherboard is equipped with the latest and most compatible drivers, maximizing the performance and stability of your computer system.
In this article, we will guide you through how to install drivers for motherboards, from identifying your motherboard model to verifying the installation. We will also discuss the importance of updating drivers and provide troubleshooting tips to help you overcome common issues that may arise during the installation process. By following these instructions, you can ensure that your motherboard is equipped with the latest and most compatible drivers, maximizing the performance and stability of your computer system.
Preparing for Driver Installation
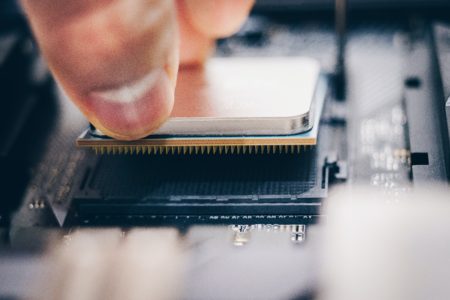
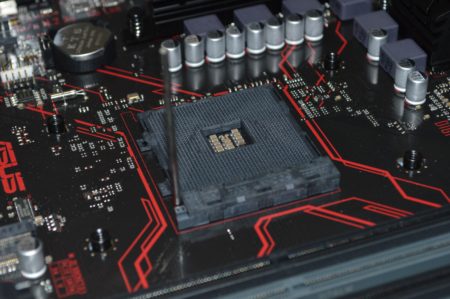
Before you can install drivers for your motherboard, you need to identify the specific model of your motherboard. The motherboard model is usually printed directly on the motherboard itself. You can look for a model number or name near the CPU socket or along the edge of the motherboard. If you have a prebuilt computer, you can also check the documentation or the manufacturer’s label on the computer case.
If you cannot physically locate the model on the motherboard, you can use software utilities to identify it. Several online tools, such as CPU-Z and Speccy, can provide detailed information about your system, including the motherboard model. Once you have determined the model, please note that you need it to download the appropriate drivers.
The next step in preparing for driver installation is determining your operating system. Motherboard drivers are typically specific to the operating system, so it is essential to download the drivers compatible with your Windows, macOS, or Linux version.
To identify your operating system, go to the “System Information” or “About” section in your settings. You will find information such as your operating system’s version number and architecture (32-bit or 64-bit) here. Please take note of this information, as it will be required when downloading the drivers from the manufacturer’s website.
Gather the necessary tools and resources before proceeding with the driver installation to ensure a smooth process. It would help to have a working internet connection to download the drivers from the manufacturer’s website. It is also advisable to have a USB flash drive or external storage device available to transfer the driver files if you are downloading them on a different computer.
Additionally, it is a good practice to have a pen and paper or a digital note-taking app handy to write down important information, such as the motherboard model, operating system version, and any specific instructions or troubleshooting steps during installation. Having these details readily available can help you reference them quickly and troubleshoot any issues that may arise.
Download Drivers
To download the drivers for your motherboard, you need to visit the official website of the motherboard manufacturer. Most manufacturers have a dedicated support or downloads section on their website where you can find the necessary drivers for your specific motherboard model.
Open your web browser and enter the manufacturer’s name in the search engine to locate their website. Once on the manufacturer’s website, navigate to the support or downloads section. Depending on the manufacturer, this section may be labeled differently, but it is typically found under the “Support” or “Drivers” tab.
You will find a search bar or a list of product categories in the support or downloads section. Look for the option related to motherboards or hardware components. Some websites may have a drop-down menu where you can select the motherboard series or product line. Choose the appropriate option that corresponds to your motherboard model.
Once you have located the correct motherboard section, you will typically find a search field where you can enter your motherboard model number. Enter the model number you identified earlier and click the search or submit button to proceed.
You may see multiple versions or revisions of the motherboard model on the search results page. Select the version that matches your motherboard’s exact model number and revision.
After selecting the correct motherboard model, you will be prompted to choose your operating system. Select the version of your operating system from the provided options, such as Windows 10, macOS Big Sur, or Ubuntu 20.04. It ensures that you download the drivers compatible with your specific operating system.
Once you have specified the motherboard model and operating system, the manufacturer’s website will display a list of available drivers and utilities for your motherboard. These drivers may include chipset drivers, audio drivers, LAN drivers, USB drivers, and more.
Look for the latest versions of the drivers and click on the download button next to each driver to initiate the download process. It is recommended to download all the necessary drivers to ensure that all components on your motherboard are adequately supported.
Save the downloaded files to a location on your computer or to a USB flash drive if you use a different device for the download. Note where you saved the files for easy access during the installation process.
Installing Motherboard Drivers
After downloading the driver files for your motherboard, you may need to extract them from a compressed format, such as a ZIP file, before proceeding with the installation. Right-click on the downloaded file and select “Extract” or “Extract Here” to extract the contents to a new folder. If the driver files are already in a usable format, you can skip this step and proceed to the next one.
Once the driver files are ready, locate the main setup or installer file. This file is usually named something like “setup.exe” or “installer.exe” and is provided by the motherboard manufacturer. Double-click on the setup file to run it and initiate the installation process.
After running the setup file, a graphical user interface (GUI) or a command-line prompt will appear, depending on the installer. Follow the on-screen prompts to begin the installation process. Read any informational messages or license agreements that may be presented and click “Next” or “Agree” to proceed.
Some driver installers may present a license agreement you must read and accept before installing. It is essential to review the terms and conditions of the license agreement. If you agree to the terms, select the checkbox indicating your acceptance and click “Next” or “Agree” to continue.
During installation, you may be given the option to select specific components or drivers to install. It is typically presented as checkboxes or a list of options. If you are still determining which features to select, installing all available drivers is generally recommended to ensure proper motherboard functionality.
However, you can install only the necessary drivers if you have specific requirements or preferences. For example, you may choose to exclude certain utilities or additional software that are not essential for the operation of your motherboard.
Once you have made the necessary selections, click “Next” or “Install” to initiate the installation process. The installer will begin installing the selected drivers onto your system. This process may take a few moments, depending on the number of drivers and the speed of your computer.
It is essential to refrain from interrupting the installation process or shutting down your computer during this time, as it may lead to incomplete installations or system instability. Allow the installation process to complete, and you will be notified when the drivers have been successfully installed.
Updating Drivers
Regularly updating your motherboard drivers is essential for optimal performance, compatibility, and security. Manufacturers often release driver updates to address bugs, improve stability, introduce new features, and ensure compatibility with the latest operating system updates or software releases.
To check for driver updates, revisit the manufacturer’s website and navigate to your motherboard model’s support or downloads section. Look for an area or tab labeled “Drivers” or “Support.” Enter your motherboard model and select your operating system to view the updates.
Some manufacturers also provide driver update utilities or software that automatically scans your system for outdated drivers and download the latest versions. These utilities can simplify the update process by identifying the drivers that require updating and automatically downloading and installing them for you.
Once you have identified the available driver updates, download the latest versions onto your computer. Follow the steps mentioned earlier in the section on downloading drivers to save the updated files.
Creating a separate folder or directory to store all your downloaded driver files for easy access and organization is an excellent practice. It will come in handy during the installation process.
To install the updated drivers, follow the same installation steps outlined in the previous section on installing motherboard drivers. Run the setup or installer file for each updated driver, carefully following the on-screen prompts, accepting license agreements (if applicable), and selecting the desired components to install.
Remember to restart your computer after installing the updated drivers to ensure the changes take effect properly.
Additional Considerations
While manually downloading and installing drivers from the manufacturer’s website is recommended, you can also consider using driver management software. These software programs can scan your system, detect outdated or missing drivers, and automatically download and install the latest versions for you. However, exercise caution when using such software and choose a reputable and reliable program to avoid potential issues.
Before installing or updating motherboard drivers, creating a system restore point is advisable. A system restore point allows you to revert your computer to a previous state if any issues arise during the driver installation. It can be beneficial if the new drivers cause compatibility problems or system instability. Creating a system restore point provides additional protection and can save you from potential headaches if issues occur.
Motherboard manufacturers release driver updates periodically to address bugs, enhance performance, and ensure compatibility with new software releases. Therefore, it is recommended to regularly check for driver updates and install them to keep your motherboard functioning optimally. Set a reminder to check for updates every few months or whenever you encounter specific issues that driver updates may resolve.
It is always a good practice to back up your important data before performing any significant system changes, including driver installations. While driver installations themselves are generally safe, unexpected issues can sometimes occur. A backup of your essential files ensures you can recover your data in unforeseen circumstances.
As you install or update drivers, keeping track of your installed driver versions is helpful. This information can be beneficial when troubleshooting issues or seeking support from the manufacturer or online forums. Note down the driver versions and the dates of installation for future reference.
In addition to installing motherboard drivers, it is also important to periodically check for BIOS updates. The BIOS (Basic Input/Output System) is firmware responsible for initializing and configuring hardware components on your motherboard. BIOS updates often provide improvements in compatibility, stability, and performance. Check the manufacturer’s website for BIOS updates specific to your motherboard model, and follow the instructions to update your system’s BIOS.
Conclusion
We began by understanding the importance of motherboard drivers and their role in facilitating communication between the operating system and hardware components. We then explored identifying your motherboard model, locating the appropriate drivers from the manufacturer’s website, and downloading them to your computer.
Next, we discussed the installation process, including extracting the downloaded files (if necessary), running the setup or installer file, and following the on-screen prompts to complete the installation. We emphasized the significance of reading and accepting license agreements, selecting the desired components/drivers for installation, and patiently waiting for the process to finish.
Finally, we discussed additional considerations such as using driver management software cautiously, creating system restore points before installation, periodic driver updates, backing up essential data, keeping track of driver versions, checking for BIOS updates, and seeking manufacturer support when needed.
In conclusion, installing drivers for your motherboard ensures optimal performance, compatibility, and functionality of your computer’s hardware components. Following the outlined steps in this guide, you can successfully install motherboard drivers and keep them up to date.
Frequently Asked Questions
How often should I update my motherboard drivers?
Checking for upd ates every few months or whenever you encounter specific issues can help ensure that your motherboard drivers are current. However, updating drivers too frequently may be unnecessary if your system is running smoothly and you are not experiencing compatibility or performance issues.
Can I install drivers meant for a different motherboard model?
Installing drivers meant for a different motherboard model is not recommended. Each motherboard has specific hardware components and configurations; drivers are designed to match those specifications. Installing drivers for a different model may result in compatibility issues, system instability, or even hardware malfunctions. Always download and install the correct drivers specifically intended for your motherboard model.
Is creating a system restore point necessary before installing motherboard drivers?
While not mandatory, creating a system restore point before installing motherboard drivers is a good practice. It allows you to revert your system to a previous state if any issues arise during installation. It can be beneficial if the new drivers cause compatibility problems or system instability. Creating a system restore point provides additional protection and gives you peace of mind when making changes to your system.
Can I use driver management software to update motherboard drivers?
While driver management software can automate scanning for outdated drivers and downloading the latest versions, it is generally recommended to download and install drivers from the manufacturer’s website manually. It ensures your motherboard model has the most up-to-date and compatible drivers. However, if you use driver management software, exercise caution and select a reputable program to avoid potential issues. Always double-check the driver versions and ensure their compatibility with your motherboard before installation.